
 Pin it
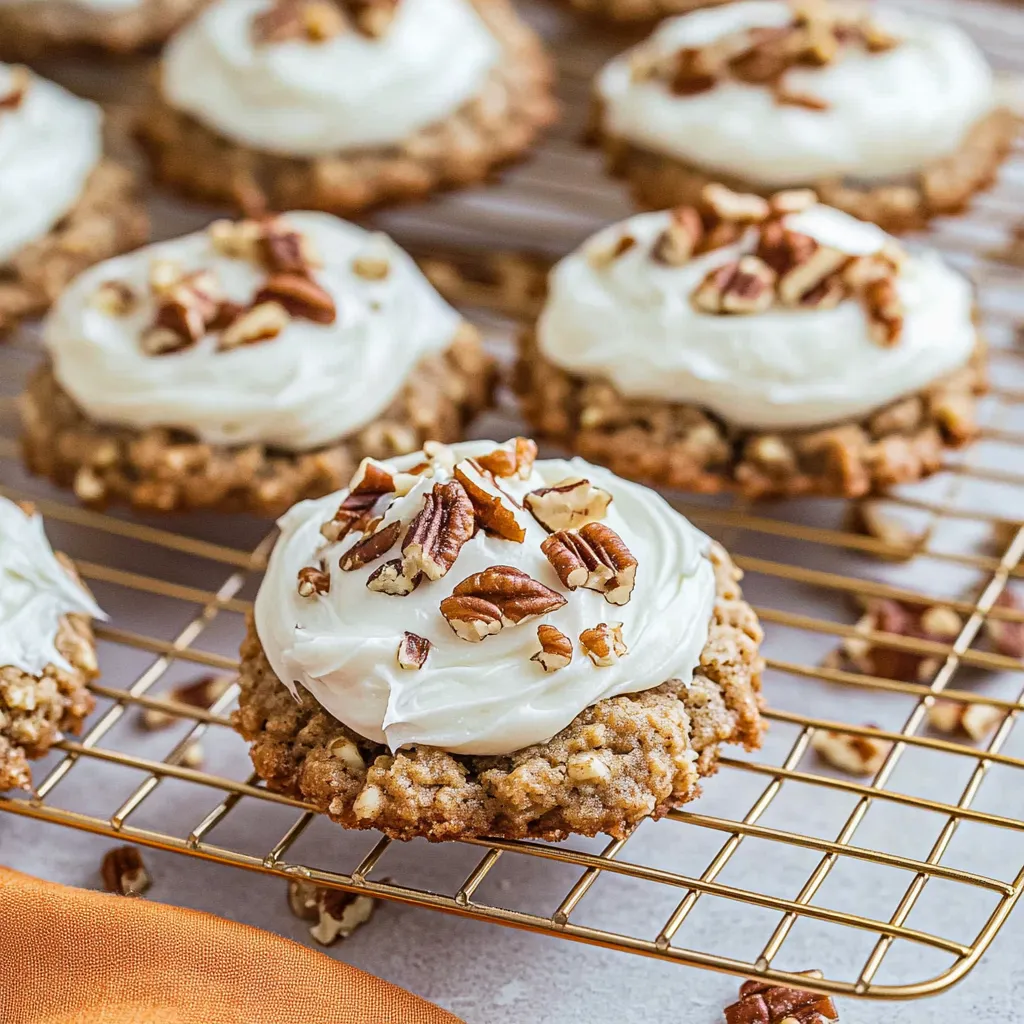
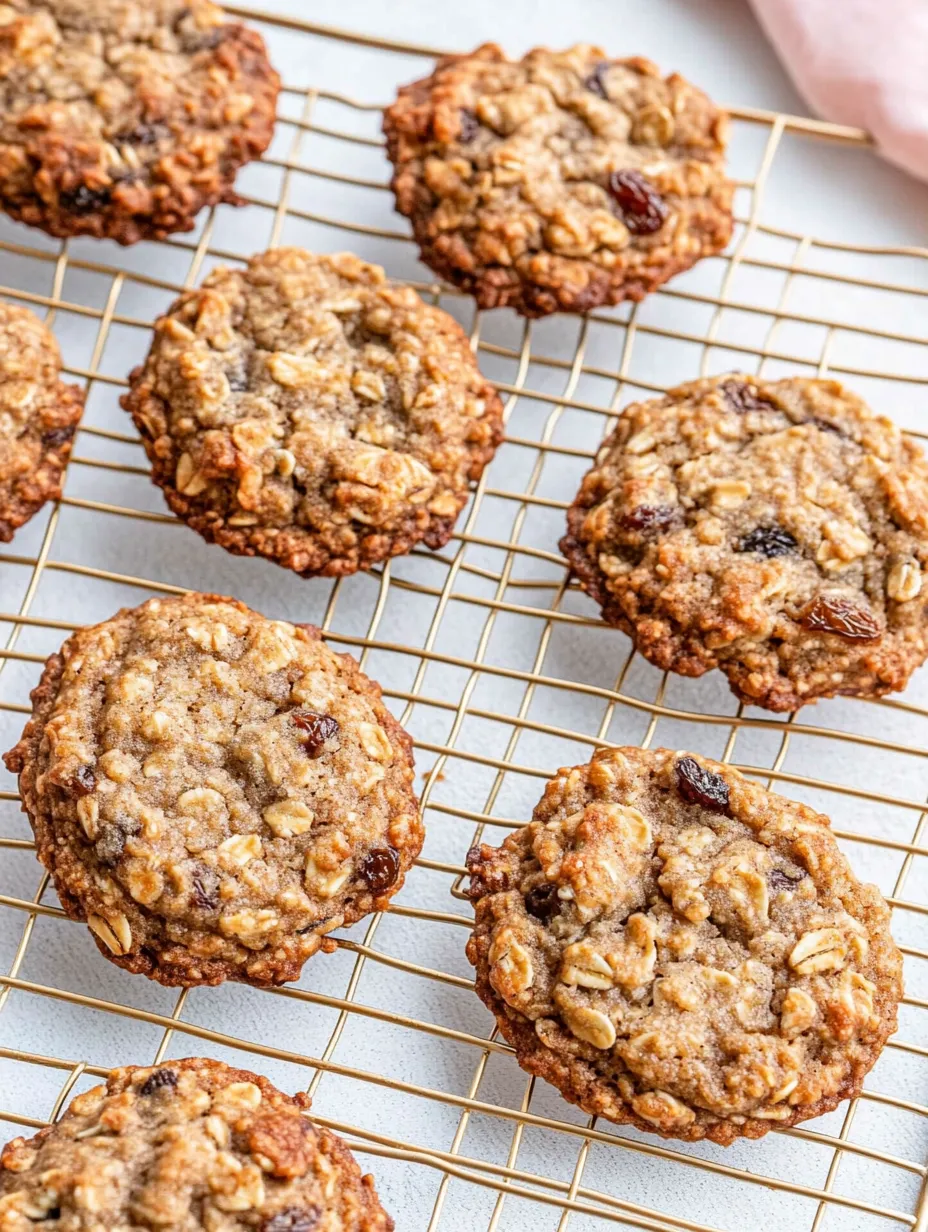
Perfectly spiced cookies packed with freshly grated carrots, chewy oats, and sweet raisins deliver all the comforting flavors of traditional carrot cake in convenient handheld form. Each bite offers the perfect balance of tender interior and lightly crisp edges, creating an irresistible texture experience that keeps you reaching for just one more. These hearty cookies bridge the gap between indulgent treat and wholesome snack, making them perfect for everything from afternoon coffee breaks to holiday cookie exchanges or casual family gatherings.
I discovered this recipe during a baking experiment when my daughter requested carrot cake for her school event but needed something more portable than traditional cake. These cookies received such enthusiastic reviews that several parents contacted me afterward requesting the recipe. My husband, who typically avoids anything containing vegetables, now requests these regularly and even brings them to his office where they consistently disappear within minutes. Something about the combination of warm spices and natural carrot sweetness creates an irresistible treat that appeals to practically everyone.
Quality Ingredient Guide
- Freshly Grated Carrots: Provide essential moisture and natural sweetness that define authentic carrot cake flavor
- Old-Fashioned Rolled Oats: Create substantial texture and nutty flavor that complement the sweet spiced dough perfectly
- Dark Brown Sugar: Contributes deep molasses notes and moisture that ensure perfectly chewy cookies every time
- Quality Cinnamon: Forms the aromatic backbone that ties all flavors together into cohesive carrot cake experience
After trying various approaches, I discovered that hand grating carrots produces significantly better results than using pre-shredded versions. The freshly grated carrots release more moisture and flavor into the dough, creating that distinctive carrot cake character. My grandmother always insisted on using dark brown sugar rather than light for recipes like this, claiming the extra molasses content creates depth that cannot be achieved any other way. After countless batches, I completely agree with her assessment.
Cookie Creation Process
- Prepare Dry Foundation
- In a medium bowl, combine all-purpose flour, fragrant cinnamon, baking soda, kosher salt, and cornstarch. Whisk these ingredients thoroughly until completely unified, ensuring even distribution of leavening agents and spices throughout. This uniform dry mixture creates consistent flavor and texture in every cookie. The often overlooked cornstarch contributes tenderness by interfering with gluten development in the flour.
- Create Butter Base
- In your large mixing bowl, pour melted and slightly cooled butter over dark brown sugar. Using electric mixer on high speed, beat this combination for a full two minutes until it transforms into a smooth, glossy mixture with visible lightening in color. This extended beating dissolves sugar crystals and incorporates air, creating proper foundation for exceptional cookie texture. Unlike typical creaming methods, the melted butter approach produces distinctively chewy rather than cakey cookies.
- Add Moisture Components
- Add room temperature eggs and pure vanilla extract to your butter mixture. Beat again on medium high speed for approximately one minute until these wet ingredients fully incorporate and mixture appears smooth and slightly increased in volume. Room temperature eggs blend more completely than cold ones, preventing uneven spots in the finished dough. The vanilla complements the cinnamon beautifully while adding aromatic depth.
- Combine Wet and Dry
- Add your whisked dry ingredient mixture to the wet ingredients. Mix on low speed just until flour disappears, stopping immediately when combined. Overmixing at this stage develops gluten that toughens cookies, so restraint proves crucial. Scrape down sides of bowl with rubber spatula to ensure all ingredients incorporate evenly without requiring additional machine mixing that might overwork the dough.
- Introduce Signature Elements
- Gently fold old-fashioned rolled oats into your dough using wooden spoon or rubber spatula rather than electric mixer. Once oats distribute evenly, add freshly grated carrots and plump raisins, folding with gentle strokes just until these components spread throughout the dough. This careful folding maintains proper dough texture while ensuring even distribution of ingredients in every cookie.
- Rest For Flavor Development
- Cover your mixing bowl with plastic wrap pressed directly against dough surface to prevent air exposure. Place in refrigerator for minimum one hour, though longer chilling up to overnight produces even better flavor development. This resting period allows flour to fully hydrate while flavors meld and intensify. The chilling also firms the dough for easier handling and helps control spreading during baking.
- Shape With Purpose
- Preheat oven to exactly 350 degrees Fahrenheit and line baking sheets with parchment paper. Remove chilled dough from refrigerator and scoop generous portions using either cookie scoop or measuring tablespoons. Create dough balls approximately two inches apart on prepared baking sheets. The substantial size ensures proper texture contrast between edges and centers during baking.
- Bake To Perfection
- Place filled cookie sheets in preheated oven and bake for precisely 11-13 minutes until edges appear set and lightly golden while centers remain slightly soft. Remove from oven when cookies appear barely done, as they continue baking from residual heat. Perfect cookies should look slightly underbaked in centers when removed, settling into ideal texture as they cool. Overbaking results in dry cookies that lack the signature chewy interior.
- Master Cooling Process
- Allow freshly baked cookies to remain on hot baking sheets for exactly five minutes after removal from oven. This controlled carryover cooking sets centers properly without overdrying edges. After initial rest, transfer cookies carefully to wire cooling racks using thin spatula to prevent breaking. Allow cookies to cool completely before applying optional frosting, approximately thirty minutes.
My son refused to try these initially because he "hates vegetables in desserts" despite loving traditional carrot cake. After watching everyone else enjoy them repeatedly, curiosity finally won and he took one small bite. His expression of surprise followed by immediate requests for more validated the deceptive nature of these cookies. The carrots contribute moisture and subtle sweetness rather than obvious vegetable flavor, converting even dedicated vegetable avoiders into enthusiastic fans.
Frosting Options
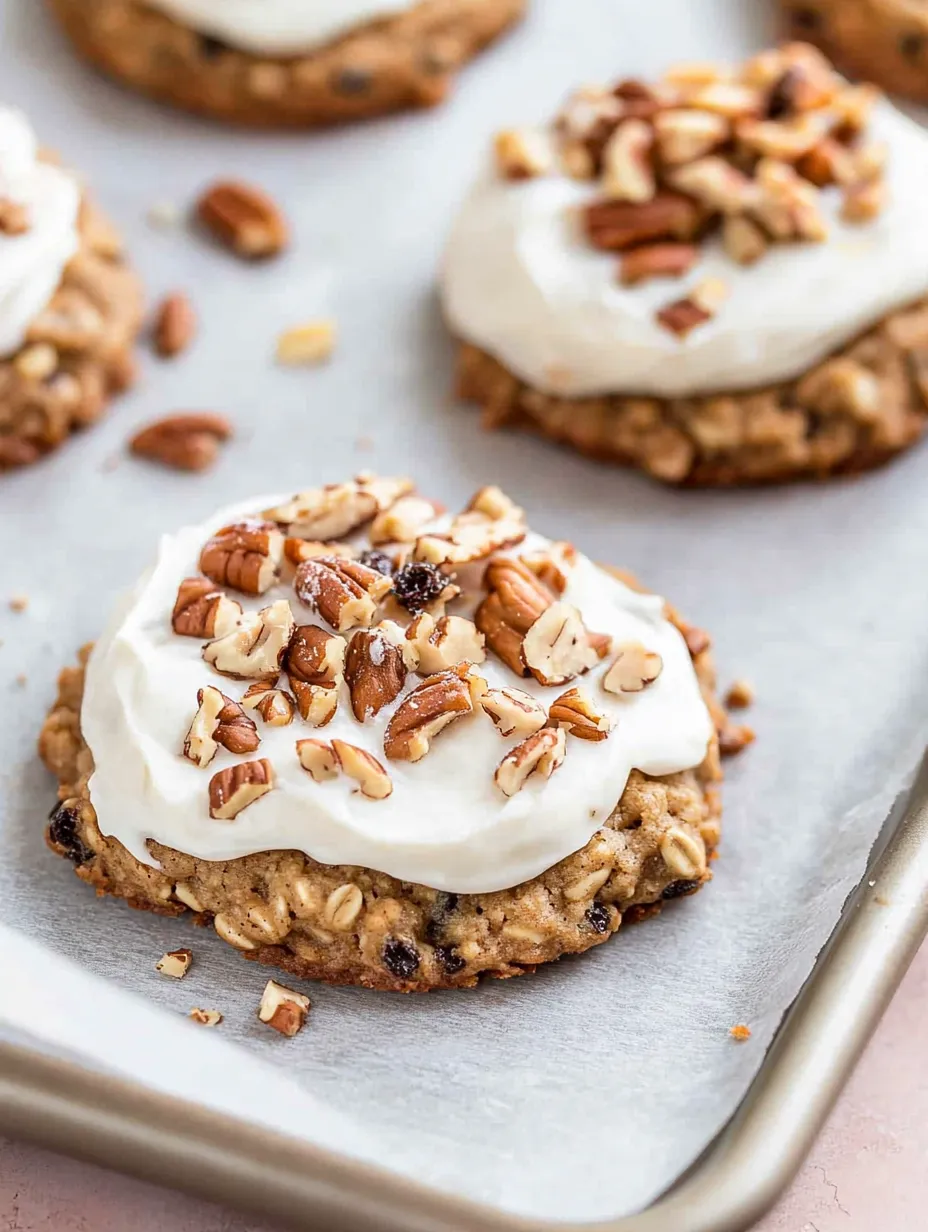
Transform these cookies from casual treats to elegant desserts through various topping approaches. Traditional cream cheese frosting creates authentic carrot cake experience that impresses guests instantly. Combine eight ounces softened cream cheese with four tablespoons softened butter, one teaspoon vanilla extract, and two cups powdered sugar until smooth and creamy. Apply generous dollop to completely cooled cookies for bakery quality presentation.
Consider exploring alternative frosting flavors that complement the spiced carrot base beautifully. Brown butter frosting introduces nutty complexity that enhances the oatmeal components while adding sophisticated flavor profile. Maple cream cheese variation creates wonderful autumn themed cookies perfect for harvest gatherings or Thanksgiving celebrations. The subtle maple notes pair perfectly with warm cinnamon and sweet carrots.
For simpler presentation that maintains focus on the cookies themselves, apply light glaze rather than thick frosting. Whisk together powdered sugar with small amounts of milk and vanilla until reaching pourable consistency. Drizzle over cookies in casual pattern that adds sweetness without overwhelming. This approach reduces sweetness while maintaining elegant appearance suitable for serving alongside coffee or tea.
Serving Presentations
Create impressive dessert platters by arranging cookies with complementary items that enhance their carrot cake identity. Pair with cinnamon dusted apple slices and small chunks of crystallized ginger for flavor echoing presentation appropriate for sophisticated gatherings. The varying textures and complementary spice notes create cohesive dessert experience beyond simple cookie service.
Consider sandwich cookie variation for special occasions or gifting purposes. Select cookies of similar size and apply generous layer of cream cheese frosting between them, pressing gently to secure. Roll edges in finely chopped toasted pecans for professional looking dessert that transforms simple cookies into memorable treats worthy of celebration dessert tables.
For casual family enjoyment, serve barely warm cookies with small glasses of cold milk for quintessential cookie experience. The slight warmth softens the spices and releases wonderful aroma that enhances eating experience significantly. This simple presentation focuses entirely on the cookies themselves, allowing their complex flavors and perfect texture to take center stage without distraction.
Storage Knowledge
Maintain optimal freshness through proper storage techniques tailored to these moisture rich cookies. Store completely cooled unfrosted cookies in airtight container with piece of bread added to maintain perfect texture. The bread gradually dries out while cookies retain ideal moisture level. Replace bread when it becomes stale to extend cookie freshness up to one week at room temperature.
Frosted versions require refrigeration due to cream cheese components. Store in single layer or place parchment between layers to prevent frosting transfer between cookies. Remove from refrigerator approximately fifteen minutes before serving to allow cookies to reach ideal temperature where flavors fully express. Cold cookies directly from refrigerator have muted flavor profiles compared to room temperature versions.
Extend enjoyment through proper freezing techniques for both baked cookies and raw dough. Freeze completely cooled unfrosted cookies in single layer until solid, then transfer to freezer bags for storage up to three months. Alternatively, portion raw dough onto parchment lined baking sheet and freeze until solid before transferring to storage bags. Frozen dough balls can be baked directly from frozen by adding two minutes to normal baking time.
After years of baking these cookies for family gatherings, I discovered that slight variations in carrot moisture content significantly impact final texture. During summer months when carrots contain more natural moisture, I often add two additional tablespoons of flour to compensate. This small adjustment maintains the perfect cookie consistency regardless of seasonal variations in produce. The most common mistake people make when following my recipe is rushing the chilling time, which truly transforms ordinary cookie dough into something extraordinary through patient waiting.
Frequently Asked Questions
- → Can I use pre-shredded carrots for these cookies?
- Fresh grated carrots work best because they're moister. Pre-shredded carrots from the store tend to be drier. If using pre-shredded, consider soaking them in water for 5 minutes, then squeezing out excess moisture before adding to the dough.
- → Why do I need to chill the dough?
- Chilling the dough allows the oats to absorb moisture and the flavors to develop. It also helps prevent the cookies from spreading too much during baking, resulting in thicker, chewier cookies.
- → Can I add nuts to the cookie dough instead of just on top?
- Absolutely! You can add 1/2 to 3/4 cup of chopped walnuts or pecans directly to the dough along with the raisins and carrots for extra texture and flavor throughout the cookies.
- → Can I substitute something for the raisins?
- If you're not a fan of raisins, you can substitute dried cranberries, chopped dried pineapple, or even white chocolate chips. You can also simply omit them altogether.
- → Why are my cookies dry?
- The most common reasons for dry cookies are overbaking or measuring the flour incorrectly. Make sure to pull the cookies out when the edges are just set but the centers still look slightly underbaked. Also, measure flour by spooning it into measuring cups and leveling off, rather than scooping directly with the cup.