
 Pin it
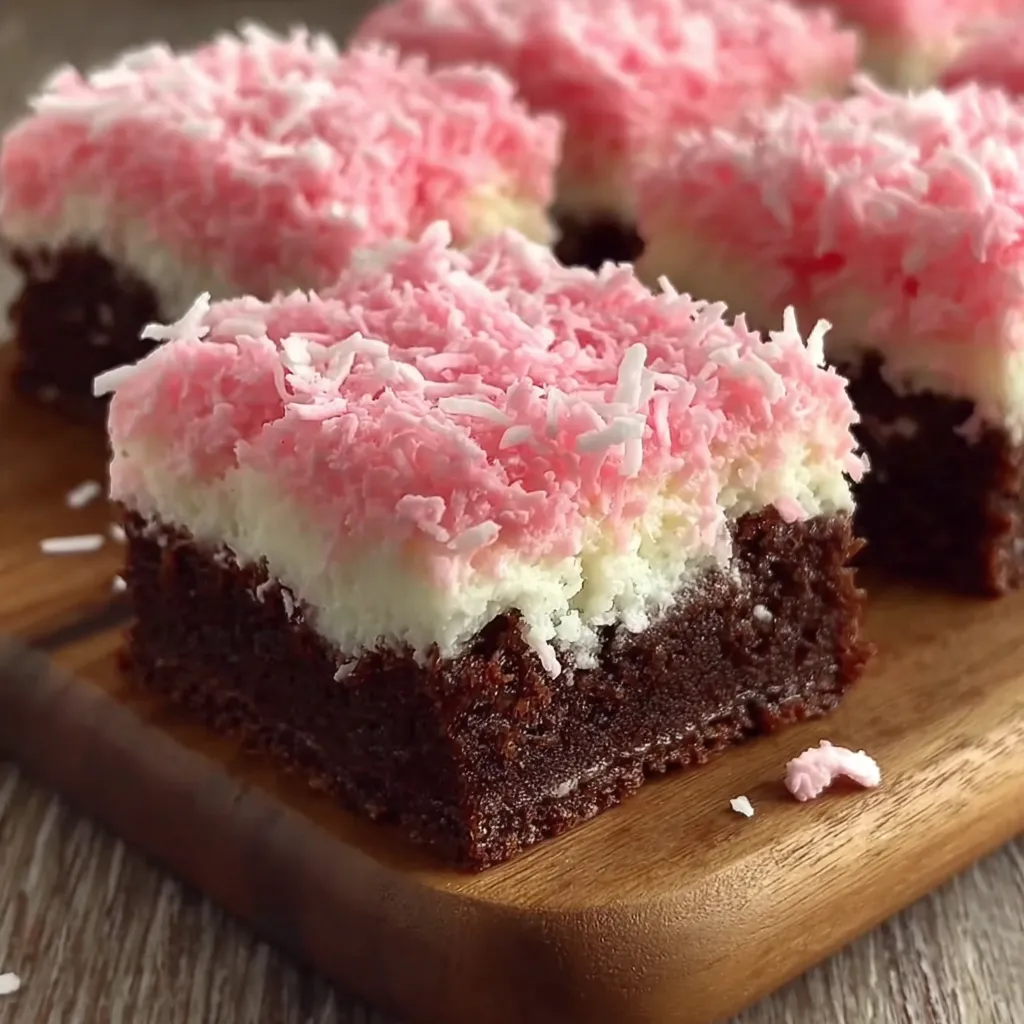
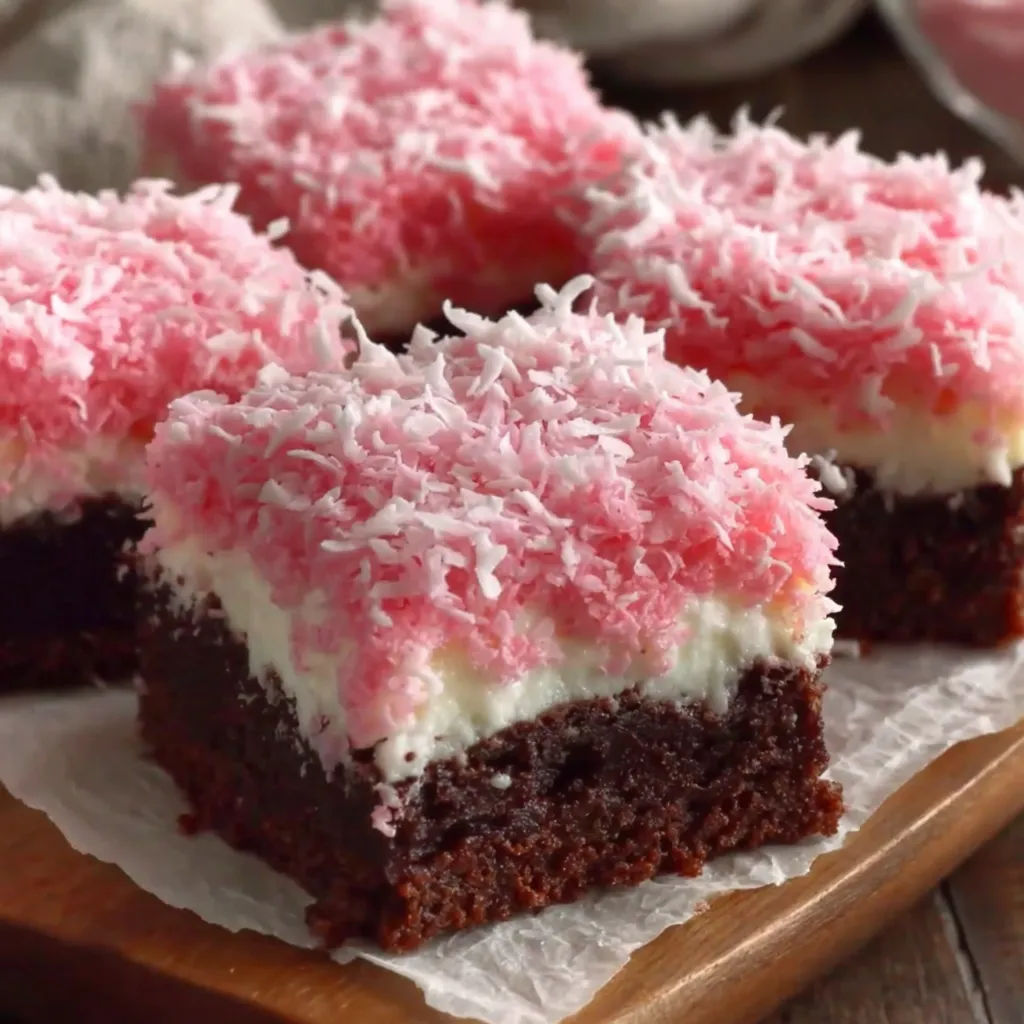
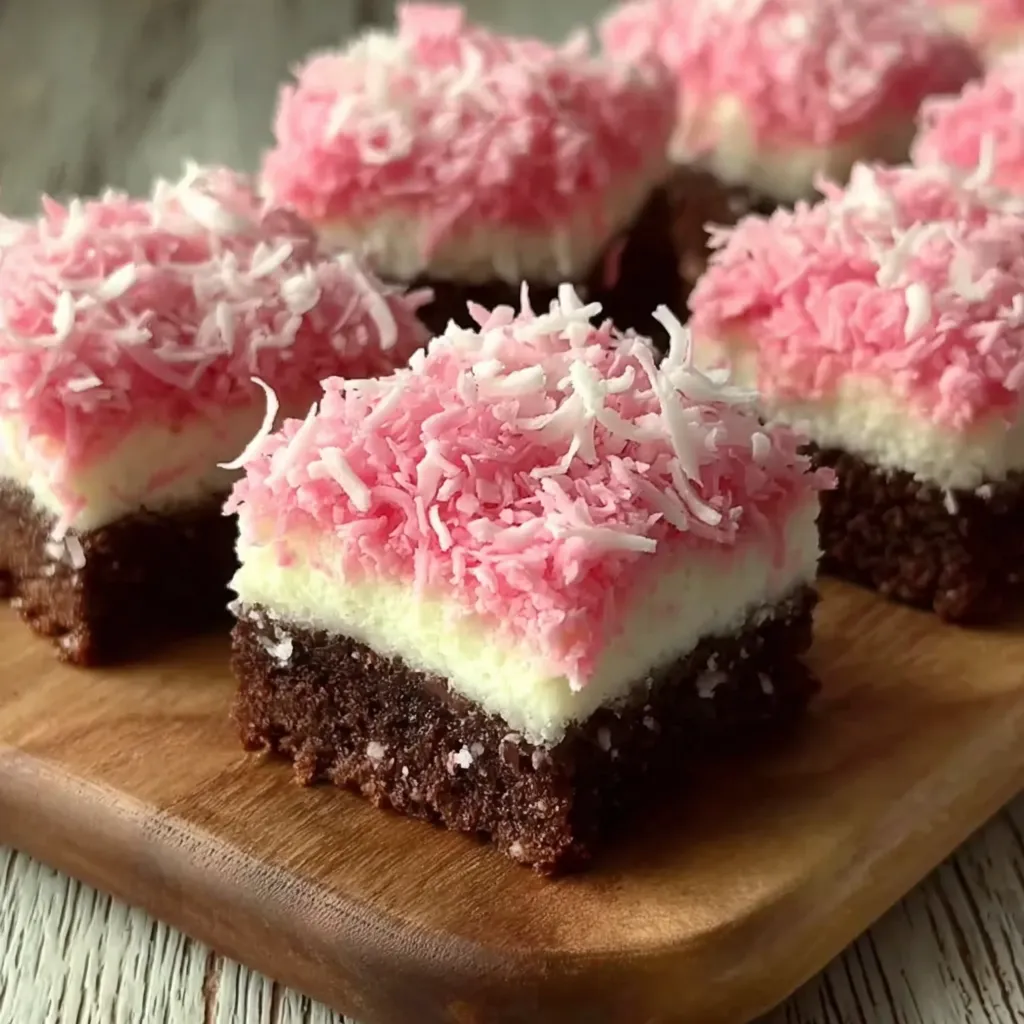
Pink Coconut Snowball Cake Bars are everything I want in a playful dessert vibrant sweet and unfussy yet so visually inviting I always find them perfect for birthdays or holidays when a classic chocolate cake just needs a little extra magic These bars combine a soft chocolate base a light fluffy cream layer and a crown of pink coconut for a treat that truly stands out
The first time I made these my niece could not wait for the bars to chill she kept peeking into the fridge and declared them the fanciest treat I have ever baked
Ingredients
- All purpose flour: gives structure and keeps the cake tender sift for best results
- Cocoa powder: adds deep chocolate flavor opt for a high quality unsweetened variety
- Baking powder plus baking soda: create a light airy crumb always check they are fresh
- Salt: balances sweetness and enhances chocolate taste use fine sea salt if possible
- Unsalted butter: brings richness let it soften for smooth creaming
- Granulated sugar: sweetens the cake batter look for fine white sugar for the best blend
- Large eggs: hold everything together and keep the cake supple use room temperature eggs for reliable rise
- Vanilla extract: deepens flavor using pure vanilla adds noticeable warmth
- Buttermilk: gives a tangy moist crumb if you do not have it use milk with a splash of lemon juice
- Hot water: ensures a silky batter and fuller cocoa bloom
- Heavy whipping cream: makes the topping cloud like aim for freshest cream to whip well
- Powdered sugar: sweetens the topping and ensures a velvety finish
- Cream cheese (optional): stabilizes the creamy layer and adds mild tang use block style for best results
- Shredded coconut: becomes the pink snowball crowning touch sweetened keeps things extra dessert like while unsweetened works for less sugar
- Pink food coloring: tints the coconut to that vintage snowy look try gel color for vibrancy
- Milk (optional): helps blend the coloring through the coconut use just enough to moisten
Step-by-Step Instructions
- Mix the Dry Ingredients:
- In a medium mixing bowl combine flour cocoa powder baking powder baking soda and salt Whisk until evenly blended to prevent clumping and ensure a uniform crumb
- Cream Butter and Sugar:
- In a larger bowl beat softened butter and granulated sugar with an electric mixer until pale and fluffy about two to three minutes Proper creaming creates a light structure
- Add Eggs and Vanilla:
- Crack in eggs one at a time beating well after each allows the eggs to emulsify for a smooth batter Pour in vanilla extract and mix until fully combined
- Combine Wet and Dry Ingredients:
- Add dry mixture to the butter mixture in thirds alternating with buttermilk Begin and end with dry ingredients scraping the bowl between additions Mix gently to avoid overworking the batter
- Blend in Hot Water:
- Pour in hot water and stir carefully Batter should loosen and become very smooth Do not overmix
- Bake the Cake:
- Transfer the batter into a greased and lined nine by thirteen inch baking pan Spread it into an even layer Bake at one hundred seventy five degrees Celsius until a toothpick comes out with a few moist crumbs about twenty five to thirty minutes Cool completely in the pan
- Prepare the Cream Layer:
- If using cream cheese beat it on medium speed until silky and lump free This adds thickness and flavor Add heavy cream powdered sugar and vanilla Beat on high speed until thick fluffy and able to hold soft peaks The mixture should resemble mousse
- Frost the Cake Base:
- Spread the cream layer over the cooled cake Use an offset spatula for an even blanket Chill briefly if mixture feels loose
- Tint and Top with Coconut:
- In a clean bowl toss shredded coconut with pink food coloring mixing with a fork until all coconut is evenly rosy Use a splash of milk if needed to help the color distribute
- Finish Assembly:
- Sprinkle tinted coconut evenly across the creamy layer Press gently so coconut adheres Chill the whole cake at least one hour before slicing for clean bars
- Slice and Serve:
- Once fully chilled cut the cake into neat bars with a sharp knife Serve cold for the best structure and flavor
I love using toasted coconut occasionally but pink coconut always brings me back to family parties where my cousin would sneak the pinkest bars off the platter first The creamy middle is her favorite part and mine too
Storage Tips
Keep the bars covered in the refrigerator for up to five days Place parchment between layers if stacking so the coconut topping stays pretty If freezing arrange bars in a single layer wrap tightly and seal for up to two months Thaw in the fridge overnight before eating
Ingredient Substitutions
For a dairy free version swap in a plant based butter and use coconut cream instead of heavy cream Plain Greek yogurt can replace the cream cheese for a tangy twist Use only unsweetened coconut and reduce the sugar slightly if you prefer a less sweet bar Natural beet powder can be used to tint the coconut instead of artificial color for a more natural look
Serving Suggestions
Slice just before serving for sharp edges and vibrant layering Arrange on a platter with chocolate drizzle or scatter with fresh raspberries for extra flair These bars pair beautifully with coffee or mint tea making them easy to serve at brunch baby showers or afternoon snacks
Cultural and Historical Context
Pink coconut treats have a vintage appeal in many American and Australian baking traditions reminiscent of holiday squares and childhood bake sales While the original snowball often meant a marshmallow centered candy this bar version is inspired by those old time flavors with a creamy twist for modern gatherings
Frequently Asked Questions
- → What makes these bars pink?
The shredded coconut is tinted with a small amount of pink food coloring, creating a vibrant top layer that gives the bars their signature look.
- → Can I use unsweetened coconut?
Both sweetened and unsweetened shredded coconut work well. For a less sweet taste, choose unsweetened coconut.
- → How do I achieve a moist cake base?
Alternating buttermilk and dry ingredients, then adding hot water, helps create a smooth, moist chocolate cake layer.
- → Should I add cream cheese for the filling?
Cream cheese adds stability and a slight tang, but the bars can be made with just whipped cream if preferred.
- → How long should the bars chill before serving?
Chill the bars for at least 1 hour so the layers set and the coconut adheres properly for tidy slicing.